> For the complete documentation index, see [llms.txt](https://help.movin3d.com/llms.txt). Markdown versions of documentation pages are available by appending `.md` to page URLs; this page is available as [Markdown](https://help.movin3d.com/movin-tracin-stage/install-the-hardware/server-back.md).
# Connect and power on
Connect the monitor and the three labeled network ports — LIDAR, OSC, and INTERNET — then power on the server and open the workspace screen.
You operate the system on a monitor connected directly to the supplied server. You need a monitor with an HDMI cable, a keyboard, and a mouse.
## Connect the network cables
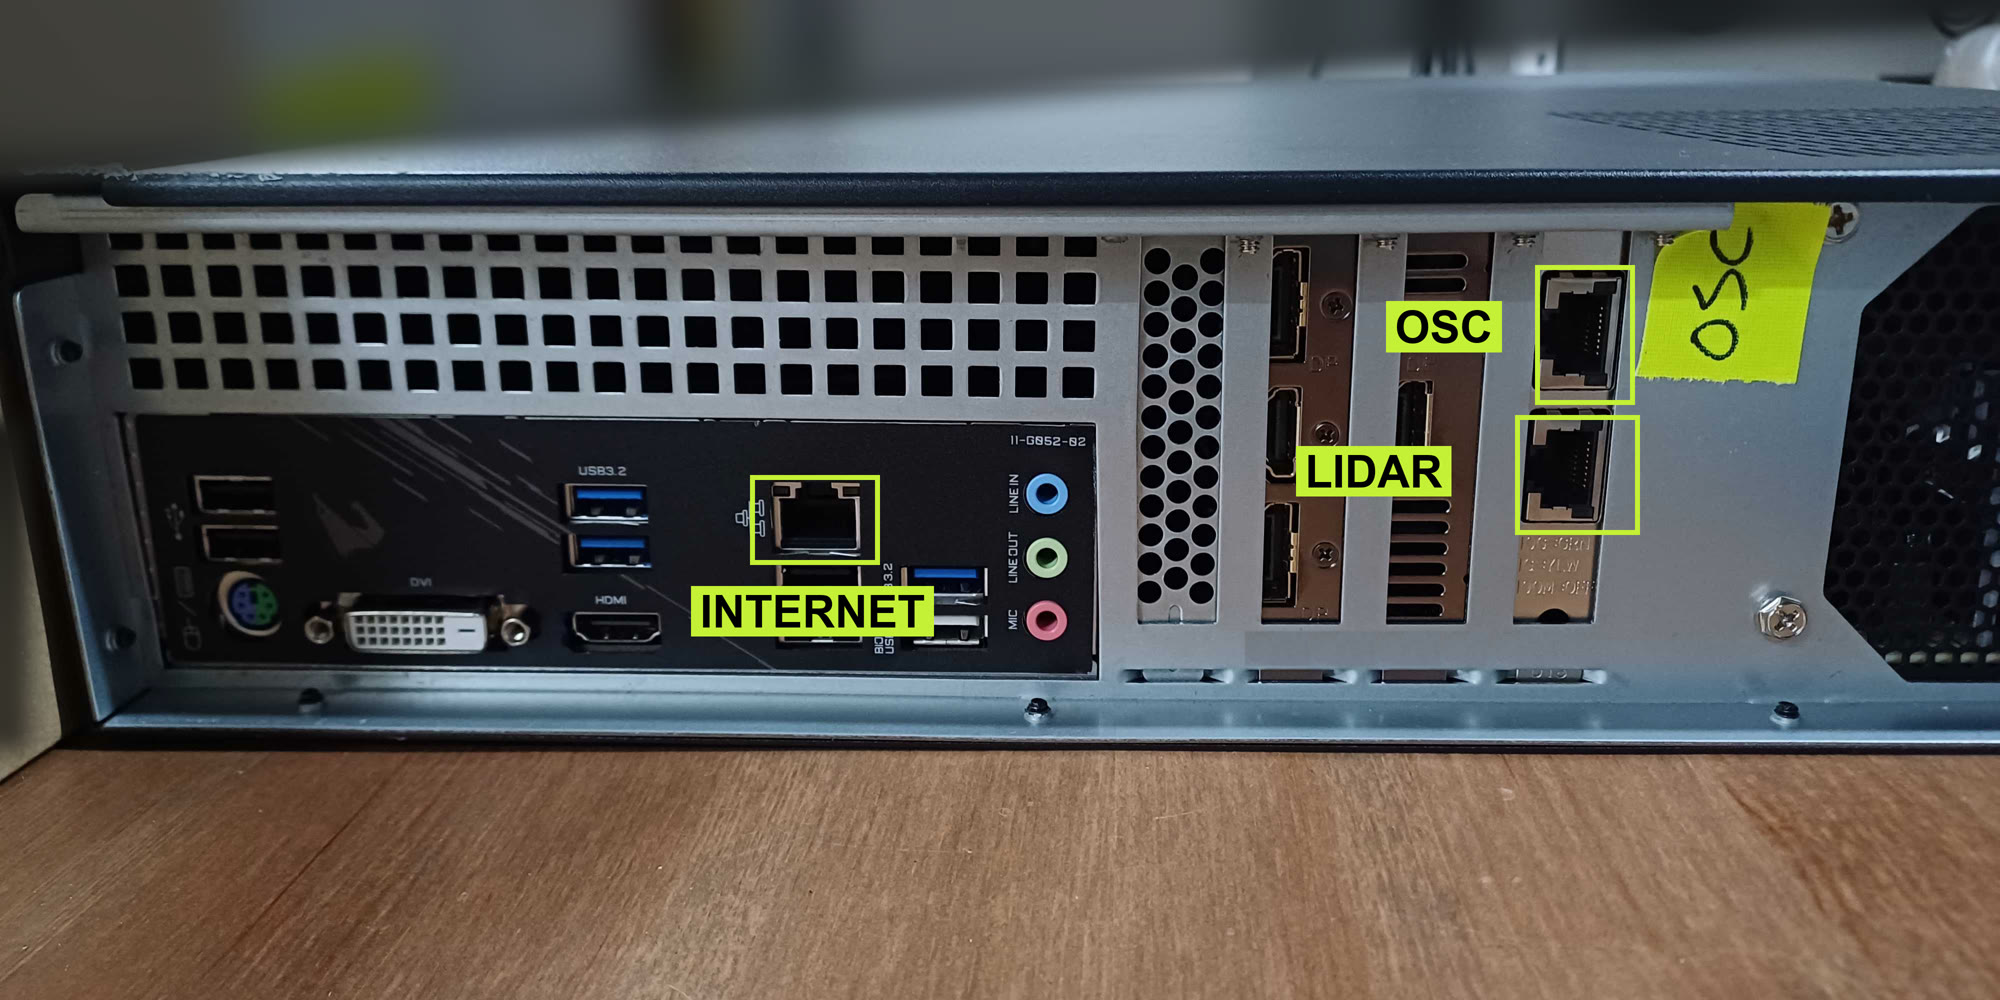
Three network ports are labeled on the back of the server, as in the photo. They are not interchangeable — each has its own cable.
The three network ports: INTERNET on the motherboard, OSC and LIDAR on the right-hand card.
**LIDAR** goes to the PoE switch the sensors are plugged into (see [Mounting the sensors](/movin-tracin-stage/install-the-hardware/sensor-mounting.md#cabling)), **OSC** goes to your show network, and **INTERNET** stays empty unless MOVIN support asks you to update the software.
{% hint style="warning" %}
Do not swap the OSC and LIDAR cables — the sensors will not be found and your show software stops receiving. If the cables were unplugged, match them to the photo before starting the system.
{% endhint %}
## Connect the monitor and controls
1. Connect the monitor to the **HDMI** port on the motherboard — the left group of ports in the photo — and select that input on the monitor. The DisplayPort outputs on the graphics card work as well.
2. Connect the mouse to a USB port on the server, or plug in its USB receiver.
3. Connect the keyboard to a USB port. You need it for IP addresses and filenames.
4. Connect the supplied power cables to the server and PoE switch, and connect the monitor to power.
## Turn on and check the screen
1. Power on the PoE switch and monitor, then press the server's power button. Powering the switch also powers the sensors.
2. Wait for the server to finish booting. The workspace opens automatically in a browser on the connected monitor. You do not need to start an application or service manually.
3. Check that the workspace's top status bar and left-hand **Calibration**, **Settings**, and **Live** stages appear. On first use, select **Got it** on the welcome screen. The status reads **SETUP** until setup is complete.
The workspace runs locally on the server at `http://localhost:8000`. This address is for the browser **on the server**; opening it on another computer does not connect to this server. Internet access is not needed for daily operation.
If the monitor says **No signal**, check its power, selected input, and display cable. If the desktop appears but the workspace does not, open a browser on the server and enter `http://localhost:8000`. If the page remains unavailable after boot, contact MOVIN support and report what the monitor shows.
Continue to [The workspace screen](/movin-tracin-stage/setup/the-workspace.md).
---
# Agent Instructions
This documentation is published with GitBook. GitBook is the documentation platform designed so that both humans and AI agents can read, navigate, and reason over technical content effectively. Learn more at gitbook.com.
## Querying This Documentation
If you need additional information that is not directly available in this page, you can query the documentation dynamically by asking a question.
Perform an HTTP GET request on the current page URL with the `ask` query parameter, and the optional `goal` query parameter:
```
GET https://help.movin3d.com/movin-tracin-stage/install-the-hardware/server-back.md?ask=&goal=
```
`ask` is the immediate question: it should be specific, self-contained, and written in natural language.
`goal` is optional and describes the broader end goal you are ultimately trying to accomplish on behalf of the user. GitBook uses it to tailor the answer towards what is most useful for that goal.
The response will contain a direct answer to the question and relevant excerpts and sources from the documentation.
Use this mechanism when the answer is not explicitly present in the current page, you need clarification or additional context, or you want to retrieve related documentation sections.